
Building a digital product in AWS
Part 3 - access controls
• Jonas Svalin
In this part of the series we will cover the essentials of how to handle access controls in your organisation. If you're yet to set up your AWS organisation, make sure to head over to Part 2 and do that first. As previously mentioned, the root user which comes with all accounts is generally to be avoided. The reason for this is that the root user has admin access to everything in your account and if the root user credentials are compromised it can have devastating consequences for your organisation. What we instead want to do is create unique users for all actors in our organisation and give them scoped permissions depending on their needs. Let's have a look at how this works in AWS.
IAM
The AWS Identity and Access Management service is the place in which we manage users and access controls within AWS. IAM works on the principle of defining who can access what and under which circumstances.
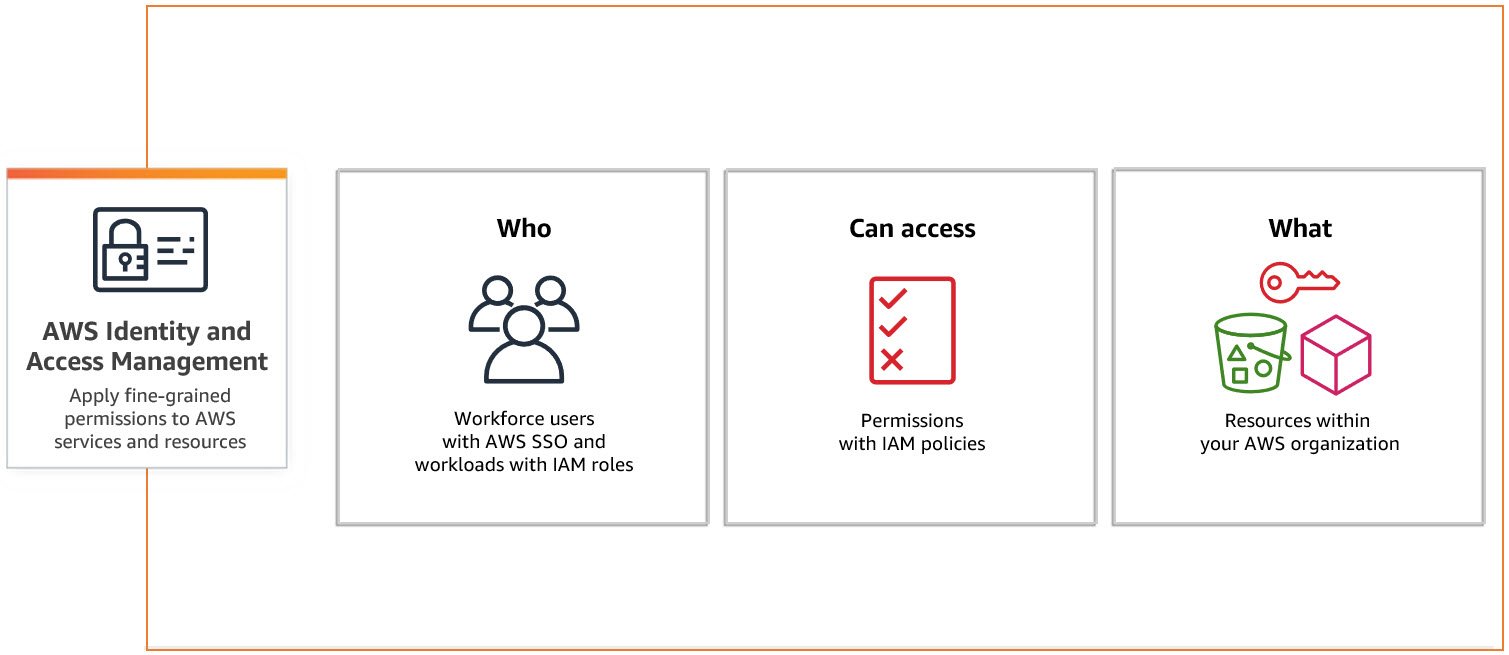
The who refers to individual actors in your organisation. The most obvious type of actor is a user representing yourself or one of your colleagues. Other types of actors are CI pipelines, microservices, and lambda functions.
The what will typically mean some technical resource such as a database, kafka cluster, or load balancer. It can also refer to things that are not directly technical components, such as billing information or logs.
Can access means specific privileges and permissions which have been assigned to an actor, allowing them to observe or modify resources in the organisation. These permissions can be applied on different levels, for example as part of an assumable role or directly on a group of users. In this blog we will show you examples of both of these permission models.
Base Account
We have created a repository which we refer to as base account, which you can find at infrablocks-example/aws-base-account. The base account is called just that because it serves as the base for each of our sub-accounts, leveraging three different InfraBlocks modules to create:
- An admin user
- Account defaults
- Assumable roles
The purpose of the admin user is to bridge the gap between the root user and the individual users which we will provision later. You can technically skip the admin user but depending on how long it will take for you to set up users and roles you may end up relying on your root user for too long, and thus increasing your exposure. We therefore provide an admin user at this early stage which has the same permissions as the root user. Unlike the root user it can be removed or otherwise limited at any time in the event that it becomes compromised.
The account defaults are a small set of reasonable default configurations which we want to apply to each of our organisational units, namely an account alias and a minimum password length policy for our users.
Finally, we have a set of roles which future users will be able to assume, depending on their specific privileges. For illustrative purposes we have taken a naive approach of providing only two roles: a read-only role and an admin role. The admin role has the same privileges as the admin user and the read-only role can inspect all resources but is not allowed to make any changes. In a real-world example you will quickly outgrow this setup and define more granular roles that are scoped to the context of the actions you want to take.
Secrets
The base account repository is one of several in which we will be using Terraform to create new users with passwords immediately assigned to them. In order for Terraform to be able to output the passwords for us in a secure manner, we need to provide a GPG key for it to encrypt the output, and a corresponding private key for you to use to decrypt the password.
In our InfraBlocks repositories we frequently rely on git-crypt as a simple way of storing secrets. As this is an example repository it already has git-crypt with an encrypted GPG key in the secrets folder. This will not be accessible to you since you don't have the required credentials to unlock the secrets folder, so you will need to remove the existing git-crypt configuration and secrets if you fork this repository. If you wish to store your own GPG key in your git repository you will first need to initialise git crypt yourself.
When you're ready to generate the GPG key, simply run the corresponding rake task:
go gpg_keys:admin:generate
This will generate the public/private key pair.
The repository is already configured to look for the GPG key in the correct
spot. If you will not be storing the GPG key in the repository you will need to
update the path for the key in the defaults.yaml.
Base Account Configuration
Before you can provision the base account repository you'll need to replace the
relevant configuration parameters. In the defaults.yaml, replace the
development-group with the ORGANISATION_IDENTIFIER you chose in
Part 2, replace example-product in the component with the name of your
product, and replace the account ids with the ids of the organisational units
that we created in Part 2. You can find them by navigating to the organisation
panel in AWS.
Since we will be provisioning the base-account for each sub-account, we need to add the root user for each sub-account to our aws-vault config and initialise the profiles before we can use it. This is the same process as in Part 2, but for completeness let's look at the development sub-account as an example. The steps are as follows:
- Add
[profile {ORGANISATION_IDENTIFIER}-development-root-user]to your.aws/configfile, configured with your own organisation identifier. - Go to the AWS console, log in as the development root user and create an Access Key ID and Secret Access Key pair.
- Run
aws-vault add {ORGANISATION_IDENTIFIER}-development-root-userto add the development root user to AWS vault.
Assuming that everything worked as expected, simply repeat the process for the remaining accounts until you have all of them set up in AWS vault.
Base Account Provisioning
Now it's time for us to provision the base account. Continuing on our development account example, run the following rake task:
aws-vault exec \
    {ORGANISATION_IDENTIFIER}-development-root-user --no-session -- \
    go "common:provision[{ORGANISATION_IDENTIFIER},development,molybdenum]"
You may be wondering what the metal name molybdenum has to do with anything at this point. This is a random identifier for our development configuration, such that if you ever wanted to spin up a second development account in parallel with your original one, you could do so under a different name and configuration.
Once again, repeat the process for all remaining sub-accounts. For every account you provision, the task will print the Terraform outputs, which includes the encrypted admin secrets. Use the private GPG key which we generated to decrypt the secrets and store them in a secure location.
Root Account
As I mentioned in the beginning, we will give you two examples of access control models in this article. The first one is to create a group in which users can be added. Policies can subsequently be applied to that group such that they automatically give permissions to each user assigned to the group. This type of access control is useful for generic permissions that we are okay with certain users leveraging all the time. In this example we will create a group for our developers and apply a policy which allows them to inspect the organisation's billing information.
The second access control model is that we will give users the right to assume the read-only and admin roles which we assigned for each sub-account in the previous section. As an example, if a developer is investigating an end-user issue, they can assume the production read-only role which will allow them to inspect CloudWatch logs in the production account. Similarly, they can assume the management admin-role if they need to update a CI pipeline in the management account, and so on. This type of access control model is more sophisticated. Access can be restricted to only when needed and it's easier to audit when and how specific permissions were leveraged.
The root account repository sets us up for trying out both access controls models, by creating:
- Personalised users
- Groups which the users can be assigned to
- Policies which are assigned to the groups
Root Account Configuration
Our example root account repository can be found at infrablocks-example/aws-root-account.
As always, we start by configuring the repository to our organisation. First
off, head over to the ibe-root-default.yaml. At the top you will find a list
of users which you'll need to replace with the users in your own organisation.
Next, we have a list of groups, with their associated users, policies and
assumable roles. You can create any number of different groups depending on the
needs of your organisation. Each of the users in your organisation needs to
create a GPG key and have the public key added to the /config/gpg folder. This
GPG key is the one which they'll use to decrypt the default passwords which are
created for their users. Just like the base account repository, you will also
need to configure the development group and the account ids in the
defaults.yaml.
Root Account Provisioning
We will start by creating the policies which are required for the access controls. Start by running the following rake task:
aws-vault exec \
    {ORGANISATION_IDENTIFIER}-root-account-root-user --no-session  -- \
    go “policies:provision[{ORGANISATION_IDENTIFIER},root,default]"
Now that we have the policies provisioned, we can create the users and the groups by running this rake task:
aws-vault exec \
    {ORGANISATION_IDENTIFIER}-root-account-root-user --no-session  -- \
    go "access_control:provision[{ORGANISATION_IDENTIFIER},root,default]"
Just like the base account, provisioning the root account will print the Terraform output which includes the encrypted secrets for the users that have been generated. Your colleagues for whom the users have been created will be able to use their private GPG keys to decrypt the passwords and subsequently use them to log in with their newly created users for the first time. The auto-generated passwords are only used for the first login, during which they will be prompted to set a new password.
Multi-factor Authentication
You may have noticed in the previous step that the configuration for our users
defines a variable called enforce_mfa. When enabled, this will force all
users to set up MFA before being able to take any further actions such as
assuming roles. We recommend always enforcing MFA since it adds a significant
layer of security to your organisation.
Access Controls in Practice
Let us now try out the two access control models we've set up in practice. Start by logging in to AWS as one of the users that you generated in the previous step. By clicking the top right navigation bar and selecting the Billing Dashboard, we are navigated to the account billing overview. This is a secured resource, but by virtue of the user being added to the developer group, we are given access to this section simply by being logged in. Had the user not been assigned to the developer group, they would not have been allowed to see this information. This is the first of our two access control models in play.
Let us now instead attempt to inspect some logs in CloudWatch. The way you'd normally do this is by navigating to the CloudWatch service and selecting Log groups in the left-hand menu. If we do this now, we are met by the following error message:

The reason for this is that, unlike the billing dashboard, there's no special permissions given by the developer group for us to access CloudWatch log groups. Instead, we have to assume one of the two roles that we created for a particular sub-account. Since we won't be making any changes but simply inspecting data, the read-only role is preferable in this case.
Click the top right navigation bar again, but this time select Switch Role. Here you'll be met by the following page:
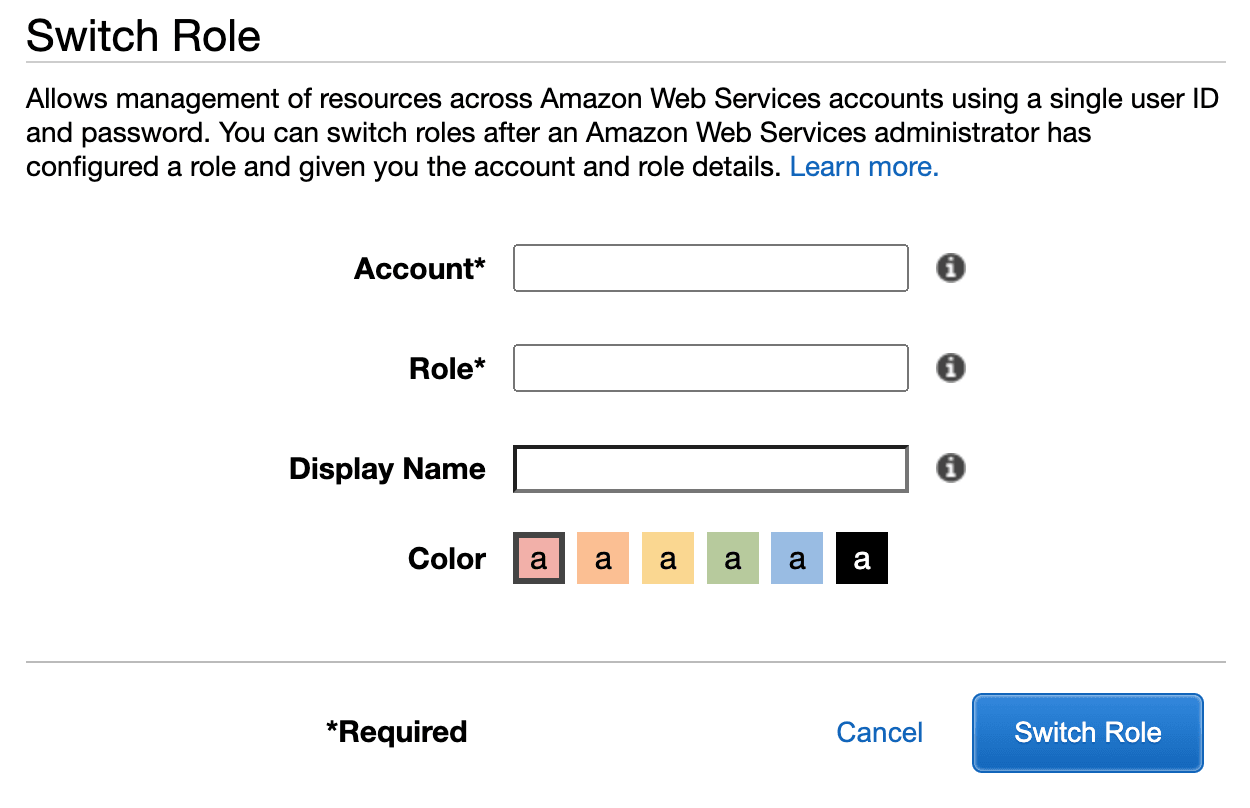
The account refers to the id of the sub-account that you want to inspect. For
example, if you're inspecting the logs for a production issue, you would use the
production account id. The role is simply the name of the desired role, in this
case it would be cross-account-read-only-role. Finally, AWS allows you to
assign a display name and colour to your role configurations, so we can for
example name this one production-read-only, and give it a colour of red since
it allows inspection of production data. If we now head back to the CloudWatch
log groups, the previous error is gone and we can freely inspect the production
logs.
Conclusion
Access control management is critical as it serves as the basis for all security in your organisation. As your product evolves you will find that you will need to add further layers of security on top of what we have configured thus far in this blog. Make sure to stay on top of the latest best practices in AWS security by regularly reviewing the guidelines AWS guidlines