Building a digital product in AWS
Part 2 - organisation setup
• Jonas Svalin
Welcome back to our series on how to build a digital product in AWS. In Part 1 we discussed the essential concepts which are required for you to effectively follow this series. In Part 2 we will take some of those concepts and put them into practice as we set up your AWS organisation using open-source InfraBlocks components. Throughout this series we will be creating example git repositories for every component which you can fork to create your own setup by modifying the configuration fields.
Organisational units
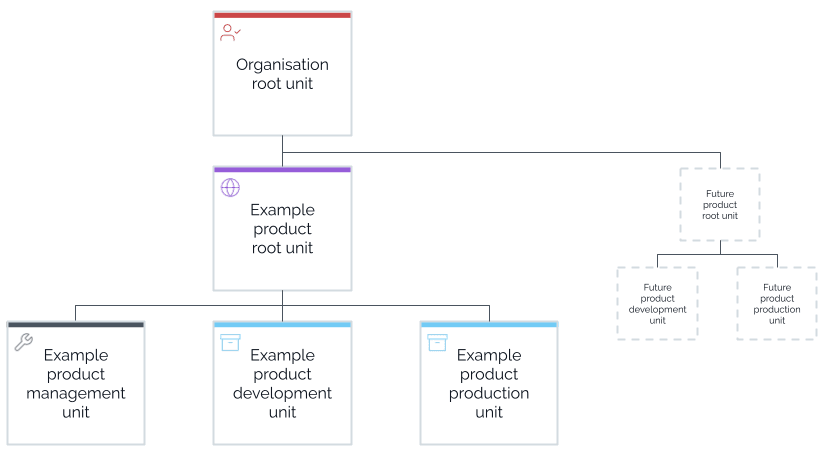
AWS models sub-parts of your organisation as organisational units. The root account is the most critical one as it typically contains things such as billing information. Other than that we rarely interact with the root account and instead operate in specialised sub-units. As part of the example that we’re creating in this series, we will imagine that our organisation is developing one product, aptly referred to as the Example Product. To develop our example product we need a base account for the product and three sub-accounts. The three sub-units will represent the 3 environments we discussed in Part 1:
- Management (for hosting non-specific infrastructure such as CI, VPNs etc)
- Development (for hosting your development environment)
- Production (for hosting your production environment)
As you follow along you are free to add more accounts as you see fit for your organisation. Perhaps you have multiple products that all need their own environments, or perhaps your product needs an additional “Staging/Pre-production” environment.
Before we get into writing some actual code we will have to create the AWS root account. This is a manual step which you can complete by navigating to aws.amazon.com/free. Creating an AWS account and setting up your organisation is free but bear in mind that if you add other components such as databases or compute resources you may begin to incur costs.
When we start to execute command line tasks against AWS we need to generate an Access Key ID and Secret Access Key for our root user. You can do this by navigating to the Access keys section under Security credentials in the AWS console. We recommend storing these fields in a secure password manager for your organisation.
aws-vault
To run any of the tasks that operate on AWS resources we need to run the task in
the context of an AWS session using aws-vault. Start by creating a file for
your AWS config under ~/.aws/config. The file initially only needs to contain
one profile but we will add further ones as we operate on the other
sub-accounts. Put the following line in the config file:
[profile root-account-root-user]
Lastly, we need to add this profile to AWS vault by running
aws-vault add root-account-root-user. You will be prompted to add the Access
Key ID and Secret Access Key for the root user that we created in a previous
step. After completing this step we are ready to execute our first task against
AWS.
Configuring the organisation
To create the rest of our AWS organisation we will leverage the InfraBlocks
module named terraform-aws-organization. We have created an example git
repository which you can fork for your own setup:
infrablocks-example/aws-organisation
To configure it for your own organisation you will need to update some of the
configuration files. Throughout the repository you will see references to ibe,
which is an abbreviation for InfraBlocks Example. We recommend that you change
this to a descriptive identifier for your own organisation. In this repo we need
to update 2 sets of configuration, the default region you want to operate in and
the root account id in the defaults.yaml, and the emails in the
global-default.yaml. Keep in mind that AWS requires that the email for each
sub-account is unique.
You can use any pattern you’d like to apply the Terraform configuration in this
repository, but we provide convenient Rake tasks that are part of the
InfraBlocks eco-system. These Rake tasks abstract away much of the complexity.
To list all the available tasks, navigate into the repository and run ./go -T.
Bootstrapping the state bucket
The first task we need to execute is the bootstrap:provision task. This task
will create the S3 bucket in which we will store all future Terraform state
related to this repository. Since this task will create a resource in AWS, it
needs to be run within the environment provided by AWS vault. Here’s the full
command, where you will need to substitute your chosen organisation identifier:
aws-vault exec root-account-root-user -- \
  go “bootstrap:provision[{ORGANISATION_IDENTIFIER},global,default]"
We have now created an empty S3 bucket in AWS. Feel free to navigate to S3 in the AWS console to confirm. The bootstrap step is part of every repository we create and is the only step that creates Terraform state which is saved locally in the repository. This file is intended to be checked in with the rest of your code in version control and is simply a reference to an S3 bucket which will contain the rest of the Terraform state for this repository.
Creating the organisation
The next step is to actually create the organisation. Once again we have a Rake task to do this for us:
aws-vault exec root-account-root-user -- \
  go "organization:provision[{ORGANISATION_IDENTIFIER},global,default]”
Congratulations! We have now created our organisation in AWS using an industry standard infrastructure-as-code setup. What this means in practice is that we now have multiple AWS accounts which are hierarchically linked to the root account which we initially created manually. You can confirm that this has worked correctly by navigating to the organisation panel in AWS.

When creating these sub-accounts, each of them has been given it’s own root user based on the emails that we previously configured. Because no password has been given to these users you will need to follow the AWS Forgotten Password reset flow to set the passwords for them. This is unfortunately a manual step which has to be done for each sub-account. Keep in mind that each sub-account has a unique account id which you can find by going to the organisational unit overview in your root account.
The root users are required for completing some of the basic steps in this series but otherwise have access rights which are too broad for general use. In Part 3 of this series we will show you how to create custom users and IAM roles to manage your access controls and the root users should henceforth only be used in case of emergency.